Thursday, December 27, 2012

INFECTION CONTROL 5


The Operation Site
Shaving
The operation area should be clean before the operation, and you have to check this in the ward before sending the patient to the OT (Figs 1.12A to E).
•     Shave the area on the morning of the operation, or as part of operation.
Preparation
Prepare the skin as soon as the patient is anesthetized.
•     Start with a soap solution, and follow this with spirit
•     If there is a low sensitivity to iodine in the community, use alcoholic iodine
•     Take a sterile swab on a holder start in the middle of the operation site, and work outwards
•     Discard both swab and holder, and repeat the process with a second swab (some surgeons use a third)
•     The last is spirit which will evaporate to leave the skin dry
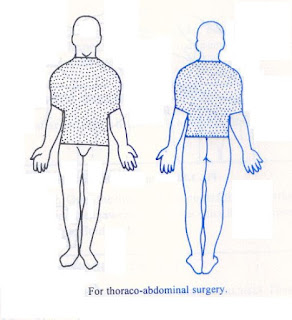
•     Be sure to prepare a wide enough area of skin
•     In an abdominal operation this should extend from the patient’s nipple line to below his groin.
Draping
The skin has been prepared
•     Place the first towel across the lower part of the operation site
•     Place another towel at right angle on the nearer edge of the operation site 
•     Apply a towel clip at the point of crossing of the two towels
•     Place another towel at the far edge of the operation site
•     The final towel goes across the top end of the site. All the corners should have towel clips to prevent them from slipping, they can go through the skin if the operation is under GA
•     In an abdominal operation an abdominal sheet covers the abdomen on top of the towels. This sheet has an opening in its middle to provide access to the operation site [double toweling]
•           If any area close to the operation site becomes contaminated at any time during the operation, place another sterile towel over the contaminated site.

Any questions be sent to drmmkapur@gmail.com
All older posts are stored i archives for access and review.
Visitors that follow may post contributions to the site.
To create consumer/provider engagement visit www.surgseminar.blogspot.com
www.drmmkapur.blogspot.com  
Thursday, December 20, 2012

INFECTION CONTROL 4


GOWNING

Hold the gown away from your body, high so as that it does not touch the floor.

•     Allow it to open up and put your arms into the arm holes while keeping your arms extended. The inside of the gown is facing you

•     Then flex your elbows and abduct your arms (Fig.)

•     Wait for the nurse to help you. She will hold the inner sides of the gown at each shoulder and pull them over your shoulders (Fig.) and will tie the tapes of the gown at the back .

GLOVING

Dust your hands with powder and rub them together to spread it.

•     Be careful to touch only the inner surface of the gloves.

•     Grasp the inner aspect of the turned down cuff of a glove, and pull it on to your opposite hand (Fig)

•     Leave its cuff for the moment

•     Put the fingers of your already gloved hand under the inverted cuff of the other glove, and pull it on to your bare hand (Figs 1.10 to 1.11A and B)

•     It is a good routine to wash your gloved hands in sterile water to remove the powder.

EYE PROTECTION

Masks and protective eyewear or face shields should be worn during procedures that are likely to generate droplets of blood or other body fluids, to prevent exposure of mucous membranes of the mouth, nose and eyes.

      They are lightweight, adjustable and do not obstruct vision. An educational programe is necessary to introduce surgeons to these new barriers.
Any questions be sent to drmmkapur@gmail.com
All older posts are stored in archives for access and review.
Visitors that follow may post contributions to the site.
To create consuer/provider egagement visit www.surgseminar.blogspot.com

Thursday, December 13, 2012

INECTION CONTROL 3


Scrubbing Up
All taking part in the surgical procedure and the OT team must scrub. The scrub rooms are situated before the entrance to the OT. 
Adjust the elbow taps to deliver water without splashing . 
In most tropical countries only a cold water tap is necessary.
•     Wet your hands, apply a little soap or detergent, and work up a good foam
•     Scrub your hands and forearms to 5 cm above your elbows for one complete minute
•     Wash your forearms
•     Then take a sterile brush and put soap on it (Fig. 1.2)
•     Scrub the lateral side of your left thumb, then its medial side, then the lateral and medial aspects of each successive finger
•     Scrub your nails, and then the back and front of your left hand 
•     Follow same routine with your right hand. Scrub for 5 minutes in all.
      Some surgeons only scrub their nails, and then thoroughly wash and rinse their hands and arms upto their elbows a number of times for 5 minutes. Rinse the suds from your hands while holding them higher than your elbows (F
•     Turn off the taps with your elbows 
      Dry your hands with a sterile towel before you put on a sterile gown
•     Dry your hands first, then your forearms
•     Grasp the folded towel with the fingers of both hands, then let it drop open, so that you don’t touch anything with the open towel
•     Dry your hands on one corner, then dry your forearms
•           Try not to bring a wet (unsterile) part of the towel back to a dry area of your arms and hands.

Any questions be sent to drmmkapur@gmail.com  
All older posts are stored in archives for access and review.
Visitors that follow may post contributions to the site.
To create consumer/provider engagement visit www.surgseminar.blogspot.com

Friday, December 7, 2012

INFECTION CONTROL 2


Aseptic Technique
Entering the Theater
Entry to the theater should be limited to the surgical team and the OT staff only.
 Visitors if allowed should conform to the same rules listed below:
•     Those that enter the theater must change, in the changing room into OT shoes and OT suit
•     Masks and caps must be worn before entering OT and gowning
•     All these items must be available in the changing rooms.
Theater Rules
The air in the OT is clean and filtered. This is required since surgical wounds are open to the air in the OT.
      It is desirable that the minimum number of people should be in the operating theater, to provide safe and efficient management of the patient. The bacteriological count in theater is related to the number of persons and their movement in the operating room. These rules of entry limits the infection rate.
      Visitors may not be allowed to enter restricted areas and watch the procedure from a visitors gallery

Any questions be sent to drmmkapur@gmail.com
All posts are stored in archives for access and review.
Visitors that follow may post contributions to the site.
To create consumer/provider engagement visit www.surgseminar.blogspot.com

Thursday, November 29, 2012

INFECTION CONTROL


INFECTION CONTROL
Infection will occur if high standards of preoperative, intra-operative, and postoperative rules are not observed in relation to the care of instruments and patients.
If there is any break of these rules by the surgical team infection in surgical patients will occur..
Mechanism
The occurrence of infection and cross-infection will rise, produc­ing anything from minor wound infections to a major disaster (tetanus) thus standing rules and procedures need to be defined by hospital Infection Control Committees (ICC) and observed by the surgical teams.
      The infection control committee, usually headed by a physician, infection control nurse, or nurse epidemiologist. Following the standards set by the ICC, it provides the hospital with an effective program with the following goals:
•     Investigate and identify source of the infection in each case. The source may be a person, a patient or an employee or may be the practice of one or more employees of poor aseptic technique, or a team member may be harboring a specific disease organism that is transmitted to the patients in his or her care.
•     To identify need for change in rule book to prevent a future outbreak
•           Provide effective isolation of infected patients.

Any questions be sent to drmmkapur@gmail.com
All older posts are stored in archives for access and review.
Visitors that follow may post contributions to the site.
To create consumer/provider engagement visit www.surgseminar.blogspot.com
www.drmmkapur.blogspot.com  

Friday, November 23, 2012

OT UPGRDE referral hopital


Infection Control, Sterilization and Care of Surgical Instruments

VENTILATION of OT

The ventilation system has a very large part to play in limiting infection.

 The temperature at 68 to 70°F (20-23°C) with a humidity of 30 to 60 percent. This reduces bacterial growth and static electricity.

Each OT should have independent temperature controls.
Air flow should be filtered through high-efficiency particulate air
(HEPA) system with 15 air exchange per hour at least three must be fresh air. Air enters the OT through vents in the ceiling and leaves through vents near the floor.
There must be a positive pressure in the OT compared to wash rooms, utility rooms and corridors.
The air ventilation system must have a routine for inspection and maintenance including change of filters

Any questions be sent to drmmkapur@gmail.com
All older posts are stored in archives for access and review.
Visitors that follow may post contributions to the site.
To create consumer/ provider engagement visit www.surgseminar.blogspot.com
www.drmmkapur.blogspot.com  

Friday, November 16, 2012

Otmanage upgrade to referral HOSPITAL

WE embark on a fresh endevour to upgrade OTMANAGE to the level of a Referral hospital
begining with the facilities in the Operating rooms.
Infection Control, Sterilization and Care of Surgical Instruments

VENTILATION of OT

The ventilation system has a very large part to play in limiting infection. 
The temperature at 68 to 70°F (20-23°C) with a humidity of 30 to 60 percent. 
This reduces bacterial growth and static electricity. Each OT should have independent temperature controls.

Air flow should be filtered through high-efficiency particulate air (HEPA) system with 15 air exchange per hour at least three must be fresh air. 
Air enters the OT through vents in the ceiling and leaves through vents near the floor.

There must be a positive pressure in the OT compared to wash rooms, utility rooms and corridors.
The air ventilation system must have a routine for inspection and maintenance including change of filters.
Any questions be sent to drmmkapur@gmail.com
All posts are stored in archives for access and review.
Visitors that follow may post contributions to the site
To create consumer /provider engagement visit www.surgseminar.blogspot.com


Friday, June 22, 2012

PROCEDURE EPIDURAL 1

EPIDURAL ANESTHESIA
Objectives
· To provide anesthesia for procedures and surgical inter­ventions (i.e., urological, gynecological, obstetrics, abdominal and orthopedic surgeries) by introducing local anesthesia into the epidural space.
· This technique is also used for providing postoperative analgesia.
· Written consent for procedure is required.
Position
Same as for spinal anesthesia.
Premedication
Oral premedication given.
Procedure
1. Procedure explained to the patient.
2. On a tiltable table.
   3. Performed at any level of spinal cord according to the desired level of analgesia.
   4. Thoracic, lumbar or caudal epidural practiced.
   5. The duration of action can be prolonged by intermittent
       injections through an epidural catheter.
   6. Epidural needles are thick and curved tips (16, 18, 20 G)
   7. Intravenous line started.
   8. Patient attached to ECG, Sp02 and NIBP monitor.
   9. Scrub and wear sterile gown and gloves.
  10. Check the epidural set on the sterile trolley for the items required, proper size needle and catheter;           proper fitting of syringe into the hub of epidural needle.
  11. Fill in a 20 ml syringe the local anesthesia to be injected into the epidural space.
  12. Read the label of drug vial carefully for the name,percentage, baricity, expiry date. Confirm it with       assistant.
13. Local anesthetic to be used for skin infiltration taken into a
2 ml syringe (2 cc. 2% xylocaine)

Any questions be sent to drmmkapur@gmail.com
All older posts are stored in archives for access.
Visitors that follow may post contributions to the site.
To create consumer/provider engagement visit www.surgseminar.blogspot.com
www.drmmkapur.blogspt.com

Friday, June 15, 2012

ANESTHESIA Procedure 1 2+3 INSTRUMENTS


Equipments Required for Tracheal Intubation
Intubation tray
· Laryngoscope and blades.
· Tracheal tube (Correct size, a size smaller and a size bigger).
· Tracheal tube connector.
· Stillete
· Magill's forceps.
· Gum elastic bougies, Size : 6 mm.
· 10 ml cuff inflating syringe.
· Plastic clamp.
· Securing tape/adhesive.
· Catheter mount.
· Local spray (4% Lignocaine).
· Lubricant anesthetic jelly.
· Sterile throat packs, gauze piece.
· Anesthesia machine and breathing system, face masks, oropharynx and nasopharyngeal airway.
Checkingthe tube position Position of the tracheal tube is checked for correct placement in trachea:
· By watching the chest movements on manual ventilation.
· Auscultating the chest for breath sounds.
· End tidal C02 value if it is attached to a capnometer.
· Compliance of the reservior bag.
· Opacification of the transparent tube during exhalation and normal oxygen saturation.
Fixing the tube The tube is attached to facial skin by adhesive tape which encircles the tube or using a cotton tape which encircles the head.
 
Any questions be sent to drmmkapur@gmail.com
All older posts are stored in archives for access and review.
Visitors that follow may post contributions.
To create consumer/provider engagement visit www.surgseminar.blogspot.com

Friday, June 8, 2012

Nasal tracheal Intubation procedure 3


Tracheal Intubation
Follows 1V induction of anesthesia in cases of GA
Emergency intubation is another reason for Nasal intubation.
Objectives
· To ensure a clear airway for anesthetized patients.
· To protect airway from regurgitation and aspiration.
· To aid and assist in control of ventilation when muscle relaxants are used.
· To facilitate suction of respiratory tract.
· To prevent collapse of lungs in thoracic operations.
   NASAL INTUBATION is also used in cases where surgery is required in the oral cavity
   and the pharynx
Position for Laryngoscope and Intubation
· Supine.
· Flexion of the head at the neck and extension of the head at the atlanto-occipital level, the so called‘sniffing’ position.
· The head is elevated placing a low pillow or ring Oral cavity axis (OA); Pharyngeal axis (PA) and laryngeal axis (LA) are different. In this all three axis brings into alignment position and vocal cords will be viewed best with laryngoscope.
Procedure
· Awake intubation in neonates sometimes.
· Emergency awake intubation in adults when airway is compromised.
· Adequate anesthesia and muscle relaxation is the usual technique.
· After 1V or inhalational induction of anesthesia, short acting depolarizing muscle relaxant, Suxamethonium (Scoline) (! To 1.5 mg/kg) or non-depolarising relaxant 1V given.
· Assited ventilation is maintained via mask with 100% O2 or with 50% N2O in Oxygen till the muscle relaxation occurs and then tracheal intubation is performed.
· Handle of the laryngoscope held in the left hand.
· The laryngoscope blade is inserted between the teeth at the right side of the mouth and the tongue is displaced on the left side.
· The blade is advanced until the epiglottis comes into view and then lifts it upwards.
· The vocal cords will b identified. If they are not seen, an assistant is asked to push downward on the larynx.
In oral surgery the pharynx needs to be packed with  ribbon gauge to prevent aspiration
of blood. 
Any questions be sent to drmmkapur@gmail.com
All older posts are stored in archives fo access and review
Visitors that follow the site may post contributions.
To create consumer/provider engagement visit www.surgseminar.blogspot.com

Thursday, May 31, 2012

ANESTHESIA Procedures 2


Tracheal Intubation
Follows 1V induction of anesthesia.
Objectives
· To ensure a clear airway for anesthetized patients.
· To protect airway from regurgitation and aspiration.
· To aid and assist in control of ventilation when muscle relaxants are used.
· To facilitate suction of respiratory tract.
· To prevent collapse of lungs in thoracic operations.
Position for Laryngoscope and Intubation
· Supine.
· Flexion of the head at the neck and extension of the head at the atlanto-occipital level, the so called‘sniffing’ position.
· The head is elevated placing a low pillow or ring Oral cavity axis (OA); Pharyngeal axis (PA) and laryngeal axis (LA) are different. In this all three axis brings into alignment position and vocal cords will be viewed best with laryngoscope.
Procedure
· Awake intubation in neonates sometimes.
· Emergency awake intubation in adults when airway is compromised.
· Adequate anesthesia and muscle relaxation is the usual technique.
· After 1V or inhalational induction of anesthesia, short acting depolarizing muscle relaxant, Suxamethonium (Scoline) (! To 1.5 mg/kg) or non-depolarising relaxant 1V given.
· Assited ventilation is maintained via mask with 100% O2 or with 50% N2O in Oxygen till the muscle relaxation occurs and then tracheal intubation is performed.
· Handle of the laryngoscope held in the left hand.
· The laryngoscope blade is inserted between the teeth at the right side of the mouth and the tongue is displaced on the left side.
· The blade is advanced until the epiglottis comes into view and then lifts it upwards.
· The vocal cords will be identified.
If they are not seen, an assistant is asked to push downward on the larynx.
Any questions be sent to drmmkapur@gmail.com
All older posts are stored in archives for aacess and review.
Visitors that follow may post contibutions.
To create consumer/provider engagement visit www.surgseminar.blogspot.com

Thursday, May 24, 2012

ANESTHESIA Procedures 1


Anesthesia Procedures
Preoperative Check
Objectives
· Patient identification and consent check for operation and anesthesia.
· Availability and check functioning of anesthesia machine, intubation sets, drugs, monitors.
· Casenote confirmation of operation decided upon for that particular patient.
Intravenous Induction
Objectives
  • To induce loss of awareness rapidly at the start of anesthesia.
  • Induction is achieved with intravenous agents (thiopentone 3-5 mg/kg, methohexitone 1-1.5 mg/kg, etomidate 0.3 mg/kg, propofol 1.5-2.5 mg/kg or ketamine 2 mg/kg).
Position
  • Supine.
Premedication
Any combination of anxiolite and antisialgogue.
Procedure
  • Intravenous cannula inserted into a peripheral vein, preferably on the dorsum of the hand and infusion fluid attached.
  • Drugs prepared in syringes and labeled (IV induction agent, muscle relaxant, atropine)
  • Patient connected to the monitor for ECG, non-invasive blood pressure (NIBP), and oxygen saturation.
  • 100% oxygen by mask before the drugs are injected.
  • Small test dose of intravenous induction agent given and effects observed for any anaphylactic reaction.
  • Rapid sequence induction technique used in emergency situation where the stomach is full or chances of regurgitation are a potential problem.
  • Anesthesia maintained with inhalational agent.
  • Tracheal intubation done using muscle relaxant.
Instruments
  • Intubation tray
  • Anesthesia machine ( check list 1, see page 99 )
  • Breathing circuits, face mask, inhalation set ( check list 1, see page 99 )
  • 1V cannula, infusion, fluid, spirit and iodine swab, adhesive plaster.
  • Drug tray and labels.
  • Normal saline bottle for dilution of drugs.
  • Induction agents-Thropentone, Propofol, Ketamine.
  • Arm boards.
  • Patient monitors for ECG, Spo2, NIBP, and ETCO2.
  • Anesthesia machine monitors (Oxygen analyser, gas monitor)
  • Emergancy drug tray(check list 11, see page 102 ).
Any questions be sent to drmmkapur@gmail.com
All older posts are stored in archives for access and reviev.
Visitors that the site may post contributions.
To create consumer/provider engagement visit www.surgseminar.blogspot.com.